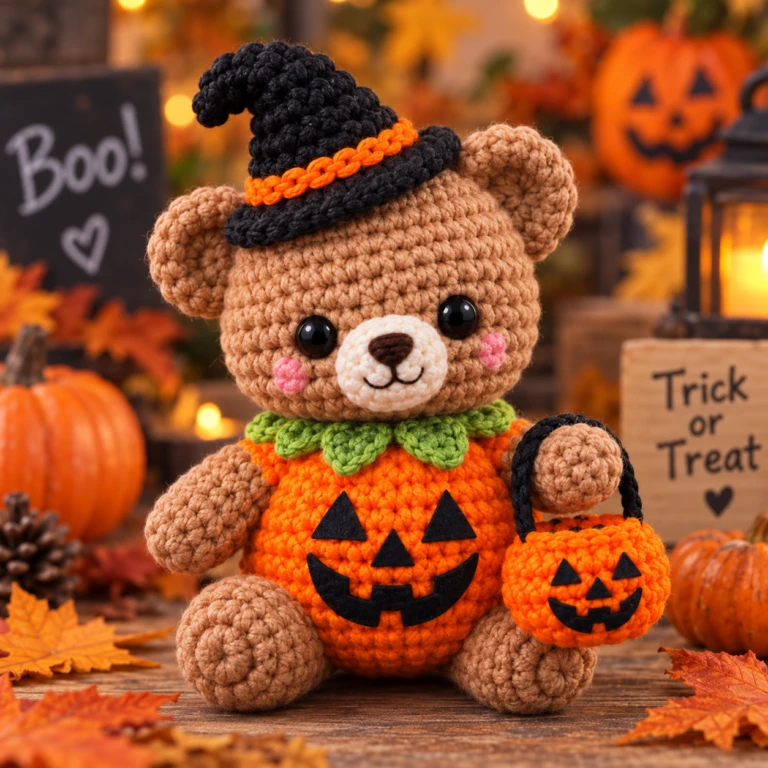
If you’re looking for a cozy Halloween crochet project, this crochet Halloween bear is a fun one to make. The design combines a classic teddy bear with a bright orange jack-o’-lantern body, a green leaf collar, a black witch hat, and a tiny pumpkin treat bucket.
It looks detailed, but the project becomes much easier when you make each piece separately and assemble everything at the end. This makes it suitable for confident beginners who already know how to crochet in the round, increase, decrease, and sew amigurumi pieces together.
The finished bear is perfect for Halloween decor, handmade gifts, seasonal craft displays, or simply as a cute autumn project.
Why You’ll Love This Crochet Halloween Bear
This pattern is playful, customizable, and full of Halloween personality without being scary.
You’ll especially love that it:

YOUR COMPLETE RECIPE COLLECTION
Stop Searching for Meal Ideas—Get 50+ Delicious Recipes in One E-Book
Get the complete recipe e-book and discover delicious meal ideas collected in one convenient place.
Discover All 50+ Recipes- Uses simple amigurumi construction
- Is made from separate, manageable pieces
- Works well with leftover yarn
- Can be customized with different colors
- Makes a beautiful Halloween decoration
- Includes a removable-looking witch hat and pumpkin bucket
- Is cute enough for children’s rooms or seasonal displays
The pumpkin body is the main feature, while the teddy bear face keeps the whole design soft and friendly.
Materials You’ll Need
Prepare the following supplies:
- Brown yarn for the bear
- Cream or ivory yarn for the muzzle
- Orange yarn for the pumpkin body and bucket
- Green yarn for the leaf collar
- Black yarn for the witch hat and bucket handle
- Small amount of orange yarn for the hat band
- Black felt or black yarn for the jack-o’-lantern face
- Pink yarn or blush for the cheeks
- Safety eyes or black embroidery thread
- Fiberfill stuffing
- Crochet hook suitable for your yarn
- Yarn needle
- Scissors
- Stitch markers
- Sewing pins
Cotton or cotton-blend yarn works particularly well because it gives the bear a neat, structured finish.
Crochet Abbreviations
This tutorial uses standard US crochet terms:
MR – magic ring
sc – single crochet
inc – increase
dec – decrease
sl st – slip stitch
ch – chain
st/sts – stitch/stitches
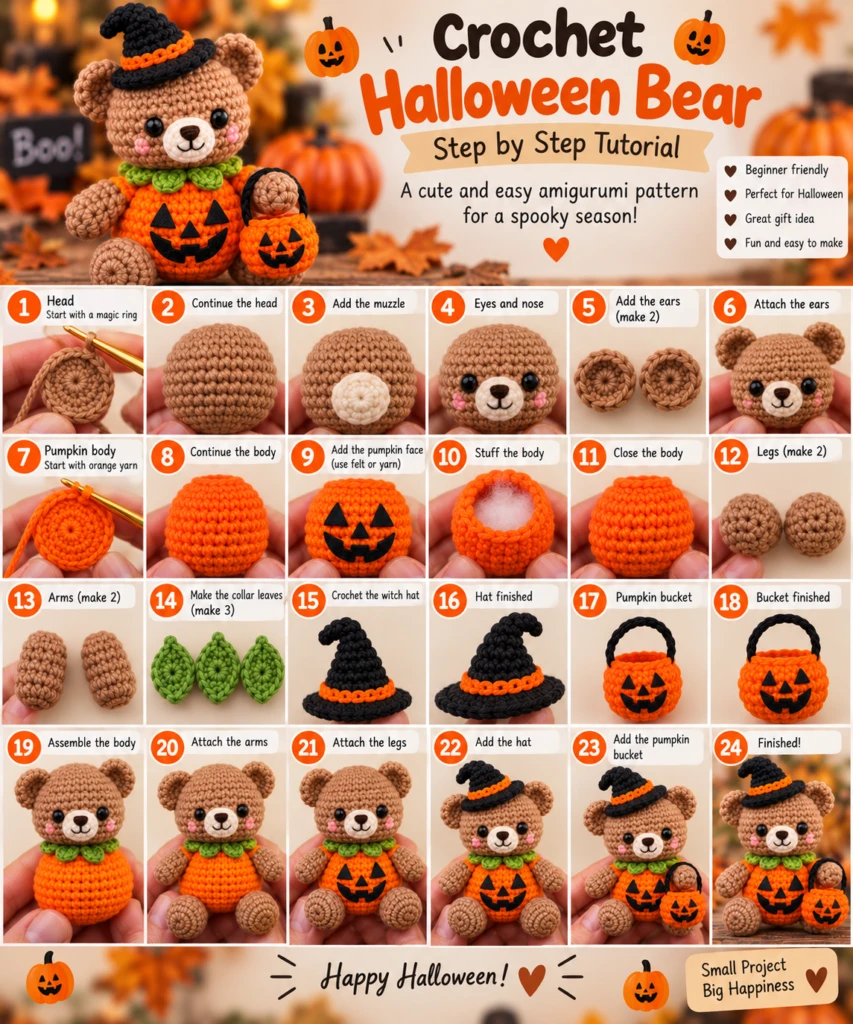
Step 1: Crochet the Bear Head
Start with brown yarn.
Make a magic ring and work your first round of single crochet stitches into the ring.
Continue increasing evenly over the next several rounds until you have a flat circle wide enough for the head.
After reaching the desired width, crochet several rounds without increasing.
The piece will begin to curve naturally into a rounded head.
When the head is almost complete, begin decreasing gradually.
Before closing the opening, add fiberfill.
Stuff the head firmly but evenly so it keeps a smooth round shape.
Do not overstuff, as this can stretch the stitches too much.
Step 2: Make the Muzzle
Using cream or ivory yarn, crochet a small flat oval or circle.
The muzzle should be noticeably smaller than the head.
Embroider a small brown or black nose in the center.
Add a short vertical line below the nose and two curved stitches to create the mouth.
Position the muzzle on the lower center of the bear’s face and sew it securely in place.
Step 3: Add the Eyes and Cheeks
Insert the safety eyes before fully closing the head if you are using them.
Place the eyes evenly on either side of the muzzle.
For a softer handmade version, embroider the eyes instead.
Add a small amount of pink yarn or blush beneath each eye to create the cute rosy-cheek look.
Make sure both cheeks are positioned symmetrically.
Step 4: Crochet the Ears
Using brown yarn, make two small circular or semicircular pieces.
Start each ear with a magic ring and increase until the ear reaches the desired size.
You can leave the ears flat or lightly stuff them.
Position one ear on each side of the head.
Pin them in place first so you can check that they are even.
Sew both ears securely to the head.
Step 5: Crochet the Pumpkin Body
Switch to orange yarn.
Begin with a magic ring and increase in rounds to form a flat circular base.
Continue increasing until the pumpkin reaches the width you want.
Then crochet several rounds without increasing.
The body will begin taking on a rounded pumpkin shape.
Near the top, begin decreasing gradually.
Stuff the body firmly before closing.
For extra pumpkin definition, use a long strand of orange yarn and wrap it vertically around the body several times.
Pull gently to create subtle pumpkin sections.
What Makes This Pattern Special
The most charming part of this design is that the bear’s torso doubles as a jack-o’-lantern pumpkin.
Instead of making a normal brown teddy body and adding clothing afterward, the orange pumpkin becomes the main body itself.
This gives the finished project a strong Halloween look while keeping the construction simple.
The green leaf collar, crooked witch hat, and miniature pumpkin bucket make it look much more detailed without requiring advanced crochet techniques.
Step 6: Add the Jack-o’-Lantern Face
Create two black triangular eyes.
Add a smaller triangle for the nose.
For the mouth, make a curved smiling shape with little square teeth.
You can use black felt or embroider the shapes directly using black yarn.
Position the pieces carefully on the front of the pumpkin body.
Check the alignment before sewing them permanently.
Step 7: Crochet the Arms
Using brown yarn, make two small elongated pieces.
Begin with a magic ring.
Increase slightly, then work several rounds evenly.
Stuff lightly.
Decrease near the top and close the opening.
Make the second arm the same way.
Leave a long yarn tail on each one for sewing.
Step 8: Crochet the Legs
The legs should be slightly larger and rounder than the arms.
Using brown yarn, start with a magic ring and increase until you have a small rounded base.
Continue in rounds to create a short oval shape.
Stuff the legs firmly.
Decrease and close.
Make two matching legs.
These will help the bear sit upright.
Step 9: Crochet the Green Leaf Collar
Using green yarn, make three or four small leaves.
Start each leaf with a short chain.
Work along the chain using a combination of slip stitches, single crochet, and taller stitches through the middle.
Work back along the opposite side.
The finished leaf should have a pointed end.
Arrange the leaves around the neckline between the head and pumpkin body.
Sew them in place so they overlap slightly.
Step 10: Make the Witch Hat
Using black yarn, start with a magic ring.
Crochet a narrow cone shape, increasing slowly.
Continue until the cone is tall enough.
To create the brim, increase much more quickly so the crochet begins spreading outward.
Work one or two rounds around the brim.
For a more whimsical appearance, gently bend the top of the hat to one side.
Using orange yarn, add a narrow decorative band around the base of the cone.
Fasten off and weave in the ends.
Step 11: Crochet the Pumpkin Bucket
Using orange yarn, make a small pumpkin-shaped pouch.
Start with a magic ring and increase until you have the desired width.
Crochet a few rounds evenly.
Decrease slightly near the top if needed.
Add a small jack-o’-lantern face using black felt or yarn.
For the handle, crochet a short black chain.
Attach one end of the chain to each side of the bucket.
The bucket should be small enough to look proportionate in the bear’s hand.
Step 12: Assemble the Bear
Start by attaching the head to the pumpkin body.
Center the head carefully and sew around the neckline using brown or orange yarn.
Next, position the arms on each side.
Sew them securely.
Attach the legs near the bottom of the pumpkin body so the bear can sit naturally.
Check the bear from the front and sides before tightening all stitches.
Step 13: Add the Leaf Collar
Arrange the green leaves around the base of the head.
Spread them evenly so they resemble the leafy top of a pumpkin.
Sew each leaf securely.
This small detail helps visually connect the teddy bear head with the orange pumpkin body.
Step 14: Attach the Witch Hat
Position the black witch hat slightly tilted on the bear’s head.
You can leave it removable, but sewing it in place is more secure.
Use black or brown yarn and stitch discreetly around the brim.
Avoid pulling too tightly, as this can distort the head.
Step 15: Attach the Pumpkin Bucket
Place the pumpkin bucket beside one arm.
Use a few discreet stitches to attach the handle or bucket to the bear’s paw.
You can also leave the bucket removable if you prefer.
Adjust the arm slightly so it looks like the bear is actually holding it.
Expert Tips for Success
Keep your crochet tension firm and consistent. Amigurumi looks best when the stuffing cannot be seen through the stitches.
Use a hook slightly smaller than the yarn manufacturer recommends.
Stuff gradually instead of adding a large amount all at once.
When assembling, always pin the pieces first.
This lets you check the proportions and placement before sewing.
Make sure the jack-o’-lantern face is centered before attaching the head, because once the bear is assembled it becomes harder to adjust.
If the bear tips forward, add slightly more stuffing toward the back of the pumpkin body or reposition the legs.
Easy Variations
There are many ways to customize this pattern.
Try a purple witch hat with a green band.
Make the pumpkin body cream instead of orange for a farmhouse-style Halloween look.
Use dark brown yarn for the bear instead of light brown.
Add tiny crochet bats to the hat.
Replace the pumpkin bucket with a tiny candy bag.
Make the cheeks peach instead of pink.
You can also create a matching set with a Halloween bunny, cat, or ghost using the same pumpkin-body idea.
Display Ideas
Your finished crochet Halloween bear looks lovely displayed with:
- Mini pumpkins
- Autumn leaves
- Fairy lights
- Lanterns
- Pinecones
- Halloween signs
- Seasonal table decorations
It also works well as a centerpiece on a shelf, desk, entry table, or Halloween party display.
Frequently Asked Questions
Is this crochet Halloween bear beginner-friendly?
Yes, if you already understand basic amigurumi techniques such as working in rounds, increasing, decreasing, stuffing, and sewing pieces together.
What yarn should I use?
Cotton or cotton-blend yarn is ideal because it creates clean stitches and helps the bear hold its shape.
Can I make the bear larger?
Yes. Use thicker yarn and a larger hook, or increase the number of rounds in the main pieces.
Can I embroider the face instead of using safety eyes?
Absolutely. Embroidered eyes are a good option, especially if the finished bear will be given to a young child.
Final Thoughts
This crochet Halloween bear pattern is a fun way to combine classic teddy-bear amigurumi with festive Halloween details.
The pumpkin body gives the project its playful seasonal character, while the leaf collar, witch hat, rosy cheeks, and pumpkin bucket make the final design feel complete and professional.
Because each piece is made separately, you can take your time and enjoy the project step by step.
Once you make one bear, you can easily adapt the same idea into different Halloween characters, colors, and accessories.
Save this pattern for your fall crochet projects and enjoy creating your own cute little pumpkin bear for Halloween.